photo SEPARATOR_zps16bb71c8.jpg  photo SEPARATOR_zps16bb71c8.jpg  photo SEPARATOR_zps16bb71c8.jpg

Sunday, December 30, 2012

Reese's Peanut Butter Cookies


     As much as it is a disappointment to me, Mike and I never actually make "Christmas" cookies. We always seem to just make whatever cookies we like. This year I was determined to make something a little different, however, which brought me to these Reese's Peanut Butter Cookies.

     These cookies were super easy. I found a few recipes using Reese's Mini's but eventually landed on this one from Six Sisters' Stuff which is an awesome blog that I follow on Pinterest. I wanted the Reese's to be mixed up into the batter so I changed things up just a little.

Enjoy!!

Reese's Peanut Butter Cookies
INGREDIENTS:
     1 cup butter
     1 cup brown sugar
     1 cup granulated sugar
     2 eggs
     1 1/2 cups creamy peanut butter
     2 1/2 cups all-purpose flour
     1 teaspoon baking soda
     1 teaspoon vanilla extract
     1 8oz pkg mini Reese's cups

DIRECTIONS:
1.  Preheat oven to 350 degrees.
2.  Cream butter, sugar, and peanut butter together.
3.  Add eggs, flour, baking soda, and vanilla extract to sugar mixture and mix. Blend in Reese's minis.
4.  Roll dough into 1 inch balls and place on an ungreased cookie sheet.
5.  Bake for 10-12 minutes or until golden brown.

Sunday, December 09, 2012

*Update* DIY photo canvas

     A few weeks ago I posted this about creating your own photo canvas. I made another canvas yesterday and wanted to update with my changes.

     Here's the new one. Winter themed!!


     Here are the updates. 

          * This looks much better without painting the sides of the canvas. 
          * Walgreens has a white border around their photo. Cut that off before trying to place your photo. 
          * Make sure your strokes while "painting" on the Mod Podge go from the top of the page to the bottom. Otherwise you can see some of the places where you started your stroke when it dries. 

     Other than that this is another super easy project. 

Print your photo, Mod Podge the entire canvas, put the photo on and let it dry, Mod Podge over the entire photo and be sure to seal the edges!!


Photo Wall Decor

     I made this post a few months ago where we personalized some frames with our last name. I had another frame laying around in the basement so I decided to print some photos and hang it. After cleaning off all the dirt and dust I got to work finding the letters I thought would work.

     I had decided to use the word "Noel" since I didn't feel like thinking too long about any other Christmas-y four letter words and used the same site as in my previous post. I narrowed it down to these four letters since they had Christmas colors in them.


     After uploading them to my Walgreens account and picking them up, all I had to do was put them in the frame and I was done. Easiest project EVER!!!


Homemade "Believe" Sign


      I worked on a lot of projects this week. Some are finished and some not, but I feel very productive. We decided on Tuesday to have a Friends Christmas Dinner this weekend and I was not happy with our Christmas decor yet. Wherever Mike and I have lived in the past four years we have turned the entire place into Christmas. This year it took every single Christmas item I had just to halfway decorate the downstairs. It definitely did not feel like our usual Christmas house.

     So, I got to work on making a few things to decorate it up a little more and called Mom for some backup decorations.

     I saw on Pinterest how you can print out letters and trace them onto wood and the pencil or pen will leave an imprint in the wood. Then you can just paint inside the imprint and you have a sign with beautiful font. So...off I went.

    I already had a piece of wood that I could use so I printed off my words and got to work. I tried to take a picture of the imprint but it wouldn't show up. However, here it is after I painted a couple coats on the wood.


     I painted a few more, probably 4 total. Maybe one day I'll learn not to get the cheapest paint out there. lol. Then I decided it needed something more on the other side. So, I got to work looking for a print to use. I found a nice Santa image I liked that didn't seem too hard to replicate so I printed it out and traced it on the wood. I decided to outline this in black. 


     Then, I painted the Santa, again a few coats and added some holly to the corners just to add a little more pizzaz. Then, VOILA!! Done!! Here he is in all his Santa glory!!!


Tuesday, December 04, 2012

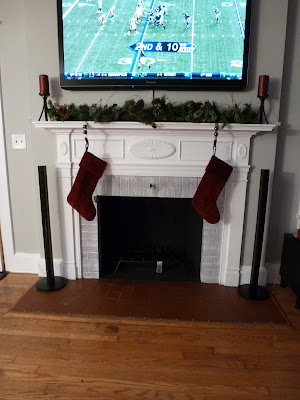
Whitewashed the Fireplace!!


OK so we finally got our fireplace working after almost a year in here. We thought it was something serious and the whole time it was only a broken bolt on the flue. Yay!! Now we can enjoy a nice fire  every night!

Our house was built in 1928 so there is a lot of old charm. One of those is our fireplace. It has a gorgeous surround, but ugly brick and red tile around the actual fireplace. It doesn't exactly fit our style of clean lines and neutral colors.


So, Mike and I randomly decided on Saturday to whitewash the brick. We looked up a few YouTube videos and blog posts and finally decided our game plan. It seemed quite easy and everything we read told us to try it so....off to JBK we went to collect our supplies!!

The whole process was incredibly easy. We literally mixed white latex paint and water in equal parts and stirred it with a paint stirrer. Then, found a paintbrush in the basement and went to work.

Mike isn't very good at straight lines so I started in on the inside and he monitored my work. This is where our experimentation came into play. In one of the blog posts we read the couple wiped off the excess paint before it dried. In another, the blogger didn't mention this so we assumed she just let the paint soak in. The major concern of us was that our bricks were very smooth. Most of the things we had read about or seen had very coarse, rough bricks. So, on the first part we used a sponge. Don't use a sponge!!! It left too many lines in the paint and it looked awful. So Mike went upstairs and grabbed an old shirt and we used that to gently wipe off the excess paint.

This was definitely the better of the two and decided to go with it for the rest of the fireplace. We finished up the first coat and let it soak into the brick a little while we decided whether to put on another.

(In hindsight I kind of wish we had left it a little lighter, however, I'm still happy with the result) You can see the streaks from wiping off the paint but I'll tell you in a sec how to make them a little less noticeable. 

We decided to add another coat so I went at it. This time I painted the entire fireplace and let the paint soak in a little before wiping off the excess. When I wiped the paint off, I took the rag and gently but quickly wiped in the same direction as the brick. As you go there will be extra paint on your cloth and you can kind of go back and even up where you may have wiped too hard. This will also remove some of the paint from the cloth so it doesn't get too gooped up. 

That's it!! When that's done, it's done!! It was definitely super easy and we got the entire process finished in about 40 minutes. Just in time for the Ravens game!!! Too bad we lost. :(

Here it is!!

 and again...


and finally....


Here's the difference!!