photo SEPARATOR_zps16bb71c8.jpg  photo SEPARATOR_zps16bb71c8.jpg  photo SEPARATOR_zps16bb71c8.jpg

Sunday, December 30, 2012

Reese's Peanut Butter Cookies


     As much as it is a disappointment to me, Mike and I never actually make "Christmas" cookies. We always seem to just make whatever cookies we like. This year I was determined to make something a little different, however, which brought me to these Reese's Peanut Butter Cookies.

     These cookies were super easy. I found a few recipes using Reese's Mini's but eventually landed on this one from Six Sisters' Stuff which is an awesome blog that I follow on Pinterest. I wanted the Reese's to be mixed up into the batter so I changed things up just a little.

Enjoy!!

Reese's Peanut Butter Cookies
INGREDIENTS:
     1 cup butter
     1 cup brown sugar
     1 cup granulated sugar
     2 eggs
     1 1/2 cups creamy peanut butter
     2 1/2 cups all-purpose flour
     1 teaspoon baking soda
     1 teaspoon vanilla extract
     1 8oz pkg mini Reese's cups

DIRECTIONS:
1.  Preheat oven to 350 degrees.
2.  Cream butter, sugar, and peanut butter together.
3.  Add eggs, flour, baking soda, and vanilla extract to sugar mixture and mix. Blend in Reese's minis.
4.  Roll dough into 1 inch balls and place on an ungreased cookie sheet.
5.  Bake for 10-12 minutes or until golden brown.

Sunday, December 09, 2012

*Update* DIY photo canvas

     A few weeks ago I posted this about creating your own photo canvas. I made another canvas yesterday and wanted to update with my changes.

     Here's the new one. Winter themed!!


     Here are the updates. 

          * This looks much better without painting the sides of the canvas. 
          * Walgreens has a white border around their photo. Cut that off before trying to place your photo. 
          * Make sure your strokes while "painting" on the Mod Podge go from the top of the page to the bottom. Otherwise you can see some of the places where you started your stroke when it dries. 

     Other than that this is another super easy project. 

Print your photo, Mod Podge the entire canvas, put the photo on and let it dry, Mod Podge over the entire photo and be sure to seal the edges!!


Photo Wall Decor

     I made this post a few months ago where we personalized some frames with our last name. I had another frame laying around in the basement so I decided to print some photos and hang it. After cleaning off all the dirt and dust I got to work finding the letters I thought would work.

     I had decided to use the word "Noel" since I didn't feel like thinking too long about any other Christmas-y four letter words and used the same site as in my previous post. I narrowed it down to these four letters since they had Christmas colors in them.


     After uploading them to my Walgreens account and picking them up, all I had to do was put them in the frame and I was done. Easiest project EVER!!!


Homemade "Believe" Sign


      I worked on a lot of projects this week. Some are finished and some not, but I feel very productive. We decided on Tuesday to have a Friends Christmas Dinner this weekend and I was not happy with our Christmas decor yet. Wherever Mike and I have lived in the past four years we have turned the entire place into Christmas. This year it took every single Christmas item I had just to halfway decorate the downstairs. It definitely did not feel like our usual Christmas house.

     So, I got to work on making a few things to decorate it up a little more and called Mom for some backup decorations.

     I saw on Pinterest how you can print out letters and trace them onto wood and the pencil or pen will leave an imprint in the wood. Then you can just paint inside the imprint and you have a sign with beautiful font. So...off I went.

    I already had a piece of wood that I could use so I printed off my words and got to work. I tried to take a picture of the imprint but it wouldn't show up. However, here it is after I painted a couple coats on the wood.


     I painted a few more, probably 4 total. Maybe one day I'll learn not to get the cheapest paint out there. lol. Then I decided it needed something more on the other side. So, I got to work looking for a print to use. I found a nice Santa image I liked that didn't seem too hard to replicate so I printed it out and traced it on the wood. I decided to outline this in black. 


     Then, I painted the Santa, again a few coats and added some holly to the corners just to add a little more pizzaz. Then, VOILA!! Done!! Here he is in all his Santa glory!!!


Tuesday, December 04, 2012

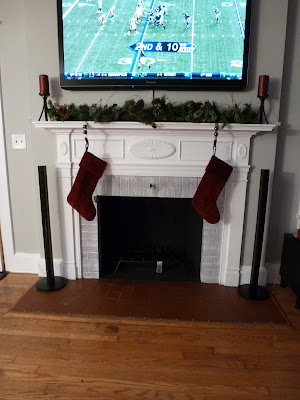
Whitewashed the Fireplace!!


OK so we finally got our fireplace working after almost a year in here. We thought it was something serious and the whole time it was only a broken bolt on the flue. Yay!! Now we can enjoy a nice fire  every night!

Our house was built in 1928 so there is a lot of old charm. One of those is our fireplace. It has a gorgeous surround, but ugly brick and red tile around the actual fireplace. It doesn't exactly fit our style of clean lines and neutral colors.


So, Mike and I randomly decided on Saturday to whitewash the brick. We looked up a few YouTube videos and blog posts and finally decided our game plan. It seemed quite easy and everything we read told us to try it so....off to JBK we went to collect our supplies!!

The whole process was incredibly easy. We literally mixed white latex paint and water in equal parts and stirred it with a paint stirrer. Then, found a paintbrush in the basement and went to work.

Mike isn't very good at straight lines so I started in on the inside and he monitored my work. This is where our experimentation came into play. In one of the blog posts we read the couple wiped off the excess paint before it dried. In another, the blogger didn't mention this so we assumed she just let the paint soak in. The major concern of us was that our bricks were very smooth. Most of the things we had read about or seen had very coarse, rough bricks. So, on the first part we used a sponge. Don't use a sponge!!! It left too many lines in the paint and it looked awful. So Mike went upstairs and grabbed an old shirt and we used that to gently wipe off the excess paint.

This was definitely the better of the two and decided to go with it for the rest of the fireplace. We finished up the first coat and let it soak into the brick a little while we decided whether to put on another.

(In hindsight I kind of wish we had left it a little lighter, however, I'm still happy with the result) You can see the streaks from wiping off the paint but I'll tell you in a sec how to make them a little less noticeable. 

We decided to add another coat so I went at it. This time I painted the entire fireplace and let the paint soak in a little before wiping off the excess. When I wiped the paint off, I took the rag and gently but quickly wiped in the same direction as the brick. As you go there will be extra paint on your cloth and you can kind of go back and even up where you may have wiped too hard. This will also remove some of the paint from the cloth so it doesn't get too gooped up. 

That's it!! When that's done, it's done!! It was definitely super easy and we got the entire process finished in about 40 minutes. Just in time for the Ravens game!!! Too bad we lost. :(

Here it is!!

 and again...


and finally....


Here's the difference!!


Monday, November 26, 2012

DIY Photo Canvas


     Ever since Mike and I got our pictures back I have been wanting to make one of these canvases. I see the tutorials all over Pinterest and thought how easy it would be to do this. The prices of photo canvases is absolutely ridiculous and there is no way we can afford as many as I want around my house. lol. 

     So...I got the motivation up last weekend and asked my friend, Abby, to join in on this adventure with me. We both braved our sicknesses and took a trip to Walmart to pick up the Mod Podge and her photo print. Then, at about 10pm, we got to it!!

     The process was definitely not a hard one. Time consuming, yes, but only because of all the waiting you have to do for everything to dry. Other than that it was just a lot of spreading, pressing, and sitting.

WHAT YOU NEED:
1 16x20 canvas
Mod Podge - I got mine in matte
your 16x20 photo of whatever print you like 
sponge brush
Xacto knife or razor blade

WHAT YOU DO:
Brush Mod Podge all over the canvas fairly thick. You can spread it on the back of the photo, too if you would like. You want to do this fairly quickly, but don't rush.

Then, place your photo on the canvas evenly and press to stick. ** I used a print from Walgreens. It was a better photo quality than Walmart, but there was an edge of white all the way around the photo. Based on my experience, definitely trim off all that white before you place the photo on the canvas.** I turned mine over on a very clean table and put something heavy on the corners just to make sure they stuck. Let that dry........

     After the Mod Podge dries (I let mine dry overnight) you need to trim the edges. I turned my canvas face down and just lined up the xacto knife with the canvas and cut. With this photo paper I needed to press very hard so make sure you aren't on a surface where you could damage anything. Gently pull off the excess paper. Then Mod Podge over the entire picture/canvas in order to seal the photo to the canvas. 


Don't worry it will dry clear...


Once it dries you are done!!!


     My corners were a little jagged because of the photo paper, but it actually didn't look that bad after the Mod Podging. I sanded down the entire side in order to make it uniform. Next time, I'll keep that in mind.

Before Mod Podge


Tuesday, November 20, 2012

Creamy Chicken Noodle Soup

Sorry about the horrible pic...
 

     I hosted our monthly Book Club at my house last night which gave me the opportunity to try out some things I have been looking forward to. I have been searching Pinterest and made one of the new "secret boards" in order to keep my thoughts straight. Might I say that those boards have come in handy lately. Especially for Christmas present ideas.

My menu included:
Creamy Chicken Noodle Soup
Deviled Eggs
Mini Pizza Bites
Tortilla Roll-ups
Warm Cheese Dip
Cheese and Crackers
and Pumpkin Spice Cake
     (I can post the recipe to most of these but I, unfortunately, did not get to take many pictures.)

      I have been really getting into soup mode since it is getting so much colder outside. I, unlike Mike, must prefer potatoey, creamy, chicken soups. He is more of a vegetable beef, brothy type of person. I came across this recipe from Pinterest and decided it seemed cheap easy enough. Most of the ingredients I already had in my pantry or fridge and it's a crock pot recipe!! So much easier for something on a school night!!

     As usual I changed some things around but here is the final recipe!

Creamy Chicken Noodle Soup
INGREDIENTS:
     5 cups chicken broth
     1 10.75oz can cream of chicken soup
     1 15oz can whole kernel corn
     1/2 cup carrots, sliced
     1/2 cup celery (I don't like celery so I left this out)
     1 cup onions, diced
     2 cups cooked chicken, shredded
     1 1/2 cups egg noodles 
     salt and pepper to taste
     

DIRECTIONS:
1. Combine everything except for the chicken and egg noodles in the crockpot.  Cook on low for 5-6 hours.

2. Add chicken and egg noodles. Turn crockpot up to high and cook another hour. Salt and pepper to taste.

Mini Pizza Bites

     This was another one of the hor d'oeuvres I served at our Book Club meeting this month. (Ok, I could have said "appetizers" but, i just really wanted to use that word. :P) I wanted something that was easy, but also didn't taste like they were from a box. I found this recipe off of, yes folks, Pinterest. Surprised??? Probably not.
     I don't usually get home from school until about 5pm and I scheduled Book Club for 6 this month so I knew I didn't have a whole lot of time. I decided to prepare all of the dry ingredients on Sunday so all I would have to do was add the wet ingredients and put them in the dish. This worked out great and I even had some down time to change before people came over. Always a plus when I can get out of my work clothes first!!
     Not only were they easy but they were also very tasty. (At least, in my opinion.) I should have warmed up the pizza sauce but I think I got too lazy by then. I recommend it, however, because it's a good way to keep the bites warm when you eat them.


Mini Pizza Bites
INGREDIENTS:
     3/4 cup flour
     3/4 teaspoon baking powder
     1 tablespoon italian seasoning
     pinch of salt
     pinch of red pepper flakes
     1/2 teaspoon garlic powder
     1 egg, lightly beaten
     3/4 cup milk
     1 cup shredded mozzarella
     1/4 cup grated parmesan
     1 cup cubed pepperoni
     1/2 cup pizza sauce

DIRECTIONS:
1. Preheat oven to 375 degrees and grease a 24-cup mini muffin pan.

2. Combine the flour, baking powder, italian seasoning, salt, red pepper flakes, and garlic powder in a large bowl. Whisk together. 

3.Whisk in egg and milk. Stir in parmesan, shredded mozzarella, and pepperoni.

4. Let stand for 10 minutes.

5. Stir the batter and divide between the mini muffin cups. Bake until golden; about 20 to 25 minutes.

6. Heat up the pizza sauce and serve. :)

Enjoy!!

Saturday, November 17, 2012

Chicken Corn Chowder


   Last Saturday seemed to be a very uneventful eventful day. I guess what that means is, although nothing was really going on, the day seemed to be quite a busy one. I woke up early in order to get to my hairdresser so she could chop 10 inches of my hair off. After that, I made a few stops in town at our local farmers market, the consignment shop, and then a few stores to pick up some groceries.

   Mike decided on Friday that he wanted to go race the car at the track one last time before winter. He left early Saturday morning in order to get the car ready and inspected before testing. While I was walking around the farmer's market I realized how cold it was getting and decided I would make some soup. Mike would be outside in the cold all day and figured he would enjoy something to warm his bones. The only problem was that I wasn't exactly sure what soup to make, nor did I have a recipe in mind, so, I bought a few different things that I figured would get me started at least.

   When I got home I checked our stock and noticed we still had some potatoes left from the potato soup we made last week. I also knew I wanted some kind of corn chowder so I got to work on both my Pinterest board and the web. I finally came across this soup from Tasty Kitchen and, judging by the picture, it looked AMAZING!!! I read through the ingredients and had everything but the bacon. (bummer!!) I kept looking but eventually decided I would just suck it up and go get the bacon because this soup looked awesome! AND IT WAS!! I changed the recipe a little, as usual, but I'm hoping it only made it better.

Chicken Corn Chowder
INGREDIENTS:
     1 lb cooked chicken, shredded (The recipe didn't tell me whether to cook it first but better safe than      sorry)
     1 cup chopped onions
     1 cup chopped red pepper
     2 cloves of garlic, minced
     1 4oz. can chiles (I used Rotel chiles and tomatoes)
     5 cups of chicken broth
     2 cups russet potatoes, peeled and diced
     1 can whole kernel corn, drained
     1 14oz. can creamed corn
     1/2 cup all-purpose flour
     1 cup skim milk
     1 1/2 cup grated cheese
     a couple hits of hot sauce
     salt and pepper to taste
     3 slices of bacon

DIRECTIONS:
Cook bacon in a large saucepan over medium heat until crispy. Remove the bacon and let it drain on a paper towel. Place off to the side. Keep drippings in the saucepan.

Add chicken, onion, red bell pepper, and garlic to the saucepan. Cook, stirring occasionally, for about 5 minutes or so. Add diced chiles and cook for another minute. Add chicken broth and potatoes. Bring to a boil, reduce heat, cover, and simmer for about 20 minutes, or until the potatoes are tender. Add whole kernel corn and creamed corn, stir well.

Pour flour into a medium bowl. (I use a mason jar instead, easier to mix.) Whisk in the skim milk, or pour it into the mason jar and shake. It should get to be like a pancake mix consistency. Add the milk mixture to the soup and cook over medium heat, stirring frequently, until the mixture thickens. Stir in grated cheese and hot sauce. Season with salt and pepper.

Garnish with crumbled bacon and extra cheese.

Enjoy!!


Friday, November 02, 2012

Easy Cheesy Chicken Casserole


So, Mike decided at about 1pm today that he was going to drive to New Jersey in order to get a new tire for his race car, therefore, I needed something easy for tonight. Because he works tonight, he only had 30 minutes home, and that is including the time it took us to drop his car off at the shop. I have been craving this dish for so long, but we never have the items on hand and Velveeta is so expensive at the local grocery store. Luckily, a brand new Wal-Mart has just opened across the street from my school!!! (P.S. Velveeta is WAY cheaper at Wal-Mart.)

Disclaimer: When you eat this, you will want more...and more. It's not exactly healthy for you, but, who cares?!?! It's delicious! And even better re-heated up!!

Easy Cheesy Chicken Casserole
INGREDIENTS:
     1lb cooked chicken, shredded
     1 can cream of chicken
     1 packet of stuffing
     8 oz Velveeta
     1/5 can corn (optional)
     Enough breadcrumbs to sprinkle (optional)

DIRECTIONS:
     1. Preheat oven to 350 degrees and spray a 2qt casserole dish with cooking spray.
     2. Prepare stuffing as directed on the package.
     3. Mix together all ingredients in a medium sized mixing bowl.
     4.  Spread mixture into casserole dish.
     5. Bake for 30 minutes or until heated through.

ENJOY!!!


Monday, October 29, 2012

DIY Earring Holder


I have been trying to get this done for months now. My earrings are in a clump in a drawer in our linen closet. I hate searching for matching earrings so I end up wearing the same ones over and over. Thanks to Hurricane Sandy I am stuck inside on a schools closed day so, why not get her done?!? So easy, if you have the materials.

All I did was use an old frame and some chicken wire or whatever that stuff is called. Here's a close up...

I cut the wire to size and then used my stapler in order to attach it to the back of the frame. A staple gun would work MUCH better. ;) 

DONE!
I spray painted my wire a turquoise color, although you can't tell in the picture, in order to match our theme in the room.

Pumpkin Spice Cake with Cinnamon Icing


Hurricane Sandy is on her way and I decided to channel my inner Martha. I spent the day baking and preparing for dinner this evening. I made this WONDERFUL dessert and also got some sweet potato casserole all ready for dinner. Unfortunately, I just guesstimated on the casserole so I can't post it because I have NO IDEA of the measurements. (If you're interested anyway, however, I'll put ingredients, at least, at the bottom.)

This dessert was AMAZING!!!! I found a bunch of different websites with suggestions on how to make this. I decided to go with this one from The Country Cook, however, because it seemed to look the most appealing...AND EASY!! And let me tell you easy it was!

Pumpkin Spice Cake with Cinnamon Icing
INGREDIENTS:
     1 box of spice cake mix
     1 15oz. can of pumpkin puree
     3 eggs
     1 tub icing
     cinnamon (optional for the icing)
  THAT'S IT!!!


DIRECTIONS:
1. Preheat oven to 350 degrees and coat your pan with non-stick cooking spray.

     2. Mix together all ingredients until smooth.

3. Spread mixture into pan. I used a bundt pan but you can use any kind of pan you have.

4. Bake for about 30 minutes. Cake should spring back to the touch and toothpick should come out clean.

5. Let cool completely.

6. While your cake is cooling, go ahead and start on your icing. 
a. Scoop icing out into a small bowl in order to mix easier.
b. Add cinnamon in small amounts and mix until desired taste.

7. Frost your cake and voila!!


You can also make this look like a pumpkin by coloring the icing orange and adding a flat bottom ice cream cone covered in brown or green icing in the middle. 

I decorated mine with orange sprinkles. :)

You must refrigerate this cake!!

ENJOY!!


OK, sweet potato casserole....cut the sweet potatoes into small cubes and boil until fork tender. Using a mixer blend these together with milk, butter, cinnamon, nutmeg, and brown sugar. Do it just like you would mashed potatoes but keep tasting to be sure they are sweet enough. You can add in some marshmallows too if you would like. Then spread into a deep pan and top with marshmallows to create a sweet crust. Cook at 350 degrees for about 30 minutes. I make mine ahead of time and keep it in the fridge which is awesome! Just increase the cook time a little if you do that, but watch to make sure the marshmallows don't burn. Browning is completely fine though.


Wednesday, October 10, 2012

Mason Jar Tiki Torch

I have been wanting to post this for a while but haven't for some reason. This was one of the easiest things I have ever done. It actually came about because a friend was coming over and I really wanted a porch night. The mosquitos were awful and I was going to try to set up the tiki torches outside of the porch screen but chickened out because I didn't want the screen to catch fire. I figured if I put them far enough away that it wouldn't it would be too far to keep the mosquitos away anyway so...

I just happen to be cleaning the porch of all the left over wedding stuff and came across some purple mason jars. I really wanted to do something with them so I put a few on the table. Just so happens that next to the mason jar sat the tiki torch insert. Hmmmm....so...I put one of the inserts into the mason jar and it fit perfectly!! Wonderful!!


A little suggestion....make sure you keep the wicks trimmed VERY low!! Otherwise you will get little black ashes all over everything including you!! 

Oh! And the mason jars I used were the bigger ones, just in case you're wondering why your tiki insert doesn't fit.

Sunday, September 30, 2012

DIY Scratch-off


These DID NOT turn out the way I thought they were going to. I, however, did not follow the directions exactly, as usual, so it could be my fault. 

Since I am at one school this year I have developed an incentive program with my kids. Ever month I choose one boy and one girl from each grade to be my Technology All-Star. These students get to choose a scratch-off to reveal a prize to them. I saw these on Pinterest and figured I would go for it.

The directions seemed pretty simple: Mix some dish detergent with acrylic paint, put tape over the "scratch-off" part, and paint. I, on the other hand, decided I was going to try to even make it easier. Instead of using the tape, I thought it would be much easier if I just laminated these at school. Not sure if this is where my problems came but...


First off, when I painted these this first time, it pretty much looked like watered down paint. I had to literally dab the paint on for it to even remotely cover the letters. This was where I really started getting worried. I have to have these scratch-offs for work on Tuesday. My first set of All-Stars are being announced then. (Can you say procrastinator?) So, I had to make it work. I just figured I would add another coat when it dried so, I left them outside under the fan and went inside.


This is what it looked like after the second coat. I let it dry and decided I would quickly put on another one.


              And finally the finished product, three coats later...


I also want to mention that the acrylic paint I got cost me $0.59 so....it may have been that, too.

Crockpot Stuffed Peppers

I know this is really late but I promised I would do it so here it goes...

These stuffed peppers were REALLY good. I even took another one for lunch the next day and it was still just as good as the first day. These were a little more time consuming that I would like seeing as how I always do crockpot stuff before work, but it still wasn't that bad. Probably could have at least cooked the rice before hand which would have saved some time.

I used a mixture of a few different recipes in order to do these so I'm going to try my best to remember exactly how I did it. But, I definitely recommend these if you like stuffed peppers.


Crockpot Stuffed Peppers

INGREDIENTS:
     4 peppers
     1 lb. of ground beef
     1 cup cooked rice
     1 small onion diced
     1 tsp. worcestershire sauce
     3 tsp. ketchup (many recipes called for diced tomatoes or crushed tomatoes which we don't like, so we added a little more ketchup.)
     1 cup shredded cheese of your choice
     1 tbsp. minced garlic
     1 jar spaghetti sauce
     1/2 cup water (or enough to coat the bottom of the crockpot)

DIRECTIONS:
1. Combine the ground beef, rice, onion, worcestershire, ketchup, cheese, and garlic in a small mixing bowl. Use your hands to incorporate everything together. (We kept out the spaghetti cause because we didn't want the stuffing to get too mushy.)

2. "Stuff" the peppers with the mixture and place in the crockpot.  I left the tops on but it's up to you what you want to do.

3.  Pour the water into the bottom of the crockpot to surround the peppers.

4. Set on low for 6-8 hours. About an hour before eating top the peppers with spaghetti sauce. (We heated up the rest and used it at our leisure while eating.)

Enjoy!!!!